
 Portal
Rebirth Order Gamma Guide
3 posters
Page 1 of 1
![]()
 Rebirth Order Gamma Guide
![]() Luna Sun May 17, 2009 10:00 am
Luna Sun May 17, 2009 10:00 am
Gods Rebirth Gamma - The Total Guide
1. Introduction
2. Goals and basics
3. Getting ready
4. Squads, classes, and builds
5. Roles
6. Positioning
7. Stages
8. Auras
1. Introduction
This guide was originally posted on the Legendary guild forum, they got it from the forums of guilds Insane and Faith. After reading it over I have made a lot of heavy edits.
2. Goals and basics
Why go there? For EXP of course! For the fastest EXP for levels 71-85! Reward for completing Gods Rebirth is about 1.5 mil EXP. It takes about three hours to do a full run.
How does it work? Get a full squad (6 people) lvl 71-85, 6 rebirth order gamma tickets, and gather at the Spiritual Disciple in one of the major cities (Archosaur 571, 646; Dreamweaver Port 661, 376; Thousands Streams 131, 857). Squad leader talks to the Spiritual Disciple then the squad is teleported to the special instance where the leader should activate another quest. The leader will need six Rebirth Orders Gamma (one for each squad member). Right after the activation of the main quest, show begins. The goal is to defend an NPC - Harpy Wraith that's located behind you from the monsters. First wave comes in 30 seconds and you meet them at the entrance to the valley. Monsters come in waves. Each wave brings mobs of one element in this order: Metal, Wood, Earth, Water, Fire. After the fifth wave of mobs a boss will come. To make things easier lets call these five waves + boss - a Stage. We have nine Stages. You will get EXP after each stage(after the boss is killed). Ordinary mobs there give 1 EXP 1 SP. To help the squad in the fight the leader can set bonus Aura's. Next to the quest NPC there are five Revelation NPC's, each of them can set an aura (around God's Eye at the canyon's entrance) according to it's name: increased HP regen, MP regen, Chi regen, Defense, or Attack. The aura's also effect Venomancer pets. Setting aura's costs some beans, which are acquired by doing quests, from chests in non-battle area, for killing mobs in non-battle area, and from killing bosses. Each level of an aura increases it's effectiveness and costs more beans. A bit more about auras and the order to set them in section 8. The mission is accomplished when the 9th (last) boss dies. EXP will be rewarded after each boss, each giving more EXP than the last, so even if you can't do a full run you will be rewarded.
Rewards:
-EXP each stage after killing the boss. First stage is roughly 40k exp, final stage is 400k+ exp. EXP for stages 2-8 fall somewhere in between.
-Mirage celestones, Tome fragments, Immaculate gems, all of which start to appear at completion of stage 5 (no sooner). When the boss is killed for stages 5+ you will get either 2 mirages or 2 tome fragments in your inventory. Gems drop from a single mob which spawns near Harpy Wraith. He also drops coins, which get divided amongst squad, giving everyone roughly 40k coins per stage.
-Not a reward but an important note: There is no EXP loss if you die, and guardian angels will not be consumed even if you have them in your inventory.
3. Getting ready
You have to prepare yourself before you go to war, even before you gather people for your squad.
Each squad member must have these items:
a) HP potions and Elixirs of your level (red and purple pots level 70 or 80)
b) Charms. HP charms on all squad members. MP charms for cleric, wizard, and archers
c) It is strongly recommended for archers to bring some MP pots. There are some mana draining mobs that can cancel archers AoE.
d) Venos and Barbs have to get some Teleport Incenses (boutique item, 10 silver) to return to the respawn point after quests (7-8 items) and opening chests (1-2 items)
e) Wizards and clerics are advised to have magic attack charms. They're really helpful on the double wave
f) For archers - Ammo!!!
Now about Remedies:
a) Archer, wizard, and cleric must have Dew of God Protection (absorbs 3000 damage for 30 seconds) to be used before the double wave
b) Barb and BM must have some defensive items. The main one is Tranquilizing Orb (8 seconds of invulnerability). For less dangerous situations Dew of Star Protection (greatly reduces all damage for 20 seconds).
c) Chi: There are two options here. Golden Jade (100 chi = 1 spark) or God's Tea (150 chi = 1.5 sparks)
d) Not that important but it's recommended for Barbs and BM to get some Nature Powder (immune to stun for 12 seconds) or Vacuity Powder (immune to stun for 20 seconds) for the last boss. Oh, and don't forget about Rebirth Orders Gamma. You can get them at the Spiritual Disciple by trading your Duty Badges once daily.
A few more notes before you start.
1. Make sure you have enough time. A full run takes about three hours of non-stop action so..
2. Eat, drink, smoke, turn off your phone, take your dog out, and visit the toilet yourself because you can not pause Rebirth. Later when you're more familiar with Gods Rebirth you will know when you can take a little break and when you can't.
3. If you make the bonus squad (barb, bm, archer, cleric, wiz, veno) make the BM the squad leader. This may help to avoid the glitch when you can't get your bonus beans.
4. Repair your equipment. You can do it inside but you might not live long enough to do it if your armor breaks in the middle of a fight.
5. Get a voice chat. It might be either Ventrilo or Team Speak. This is not a must, but is highly recommended, especially when one or more members are running this quest for the first time.
1. Introduction
2. Goals and basics
3. Getting ready
4. Squads, classes, and builds
5. Roles
6. Positioning
7. Stages
8. Auras
1. Introduction
This guide was originally posted on the Legendary guild forum, they got it from the forums of guilds Insane and Faith. After reading it over I have made a lot of heavy edits.
2. Goals and basics
Why go there? For EXP of course! For the fastest EXP for levels 71-85! Reward for completing Gods Rebirth is about 1.5 mil EXP. It takes about three hours to do a full run.
How does it work? Get a full squad (6 people) lvl 71-85, 6 rebirth order gamma tickets, and gather at the Spiritual Disciple in one of the major cities (Archosaur 571, 646; Dreamweaver Port 661, 376; Thousands Streams 131, 857). Squad leader talks to the Spiritual Disciple then the squad is teleported to the special instance where the leader should activate another quest. The leader will need six Rebirth Orders Gamma (one for each squad member). Right after the activation of the main quest, show begins. The goal is to defend an NPC - Harpy Wraith that's located behind you from the monsters. First wave comes in 30 seconds and you meet them at the entrance to the valley. Monsters come in waves. Each wave brings mobs of one element in this order: Metal, Wood, Earth, Water, Fire. After the fifth wave of mobs a boss will come. To make things easier lets call these five waves + boss - a Stage. We have nine Stages. You will get EXP after each stage(after the boss is killed). Ordinary mobs there give 1 EXP 1 SP. To help the squad in the fight the leader can set bonus Aura's. Next to the quest NPC there are five Revelation NPC's, each of them can set an aura (around God's Eye at the canyon's entrance) according to it's name: increased HP regen, MP regen, Chi regen, Defense, or Attack. The aura's also effect Venomancer pets. Setting aura's costs some beans, which are acquired by doing quests, from chests in non-battle area, for killing mobs in non-battle area, and from killing bosses. Each level of an aura increases it's effectiveness and costs more beans. A bit more about auras and the order to set them in section 8. The mission is accomplished when the 9th (last) boss dies. EXP will be rewarded after each boss, each giving more EXP than the last, so even if you can't do a full run you will be rewarded.
Rewards:
-EXP each stage after killing the boss. First stage is roughly 40k exp, final stage is 400k+ exp. EXP for stages 2-8 fall somewhere in between.
-Mirage celestones, Tome fragments, Immaculate gems, all of which start to appear at completion of stage 5 (no sooner). When the boss is killed for stages 5+ you will get either 2 mirages or 2 tome fragments in your inventory. Gems drop from a single mob which spawns near Harpy Wraith. He also drops coins, which get divided amongst squad, giving everyone roughly 40k coins per stage.
-Not a reward but an important note: There is no EXP loss if you die, and guardian angels will not be consumed even if you have them in your inventory.
3. Getting ready
You have to prepare yourself before you go to war, even before you gather people for your squad.
Each squad member must have these items:
a) HP potions and Elixirs of your level (red and purple pots level 70 or 80)
b) Charms. HP charms on all squad members. MP charms for cleric, wizard, and archers
c) It is strongly recommended for archers to bring some MP pots. There are some mana draining mobs that can cancel archers AoE.
d) Venos and Barbs have to get some Teleport Incenses (boutique item, 10 silver) to return to the respawn point after quests (7-8 items) and opening chests (1-2 items)
e) Wizards and clerics are advised to have magic attack charms. They're really helpful on the double wave
f) For archers - Ammo!!!
Now about Remedies:
a) Archer, wizard, and cleric must have Dew of God Protection (absorbs 3000 damage for 30 seconds) to be used before the double wave
b) Barb and BM must have some defensive items. The main one is Tranquilizing Orb (8 seconds of invulnerability). For less dangerous situations Dew of Star Protection (greatly reduces all damage for 20 seconds).
c) Chi: There are two options here. Golden Jade (100 chi = 1 spark) or God's Tea (150 chi = 1.5 sparks)
d) Not that important but it's recommended for Barbs and BM to get some Nature Powder (immune to stun for 12 seconds) or Vacuity Powder (immune to stun for 20 seconds) for the last boss. Oh, and don't forget about Rebirth Orders Gamma. You can get them at the Spiritual Disciple by trading your Duty Badges once daily.
A few more notes before you start.
1. Make sure you have enough time. A full run takes about three hours of non-stop action so..
2. Eat, drink, smoke, turn off your phone, take your dog out, and visit the toilet yourself because you can not pause Rebirth. Later when you're more familiar with Gods Rebirth you will know when you can take a little break and when you can't.
3. If you make the bonus squad (barb, bm, archer, cleric, wiz, veno) make the BM the squad leader. This may help to avoid the glitch when you can't get your bonus beans.
4. Repair your equipment. You can do it inside but you might not live long enough to do it if your armor breaks in the middle of a fight.
5. Get a voice chat. It might be either Ventrilo or Team Speak. This is not a must, but is highly recommended, especially when one or more members are running this quest for the first time.

Luna- Admin
- Number of posts : 83
Age : 39
Location : In My Dreams
Reputation : 0
Registration date : 2009-03-04
![]()
![]()
Re: Rebirth Order Gamma Guide
![]() Luna Sun May 17, 2009 10:01 am
Luna Sun May 17, 2009 10:01 am
4. Squads, classes, and builds
One of the essential parts of this guide. We will aim to make a full run, mainly because a squad that can do a full run can make it beyond the double wave, where chances for a random squad to do it are close to zero. Let's see which classes/builds are good for Gods Rebirth.
Cleric: Either pure mag or mag/vit hybrid. Light armor is better at the beginning (especially if you have inexperienced barb and BM) because there are plenty of physical mobs in the first stages. During later stages light armor can be at least as good as other builds if you have really good equipment refined and sharded. For pure mag builds things are hard all the way (manly because of lack of HP). Hp shards in equipment is strongly recommended for pure mag builds. Skills: Regeneration Aura - max, Purify 5+ if you have one DD and 7+ if you have two DDs to take care of at the end of the second Stage, Squad buffs - max, and max heals of course.
Venomancer: Any build works. Herc is recommended. Build doesn't matter as venos are not required to do damage (would be nice to do some though) and Amplify Damage or Befudding Mist can be used by any build. Veno's also don't take much damage though sometimes die from AoE at the last boss, trying to cast Amplify Damage.
Skills: Parasitic Nova - the higher the better as paralysis time increases, Befudding Mist -lvl 10, Amplify Damage - lvl 10, Bramble Guard, Summer Sprint, and Soul Transfusion.
Wizards: Light armor builds are preferred. Of course quality of equipment and refining is crucial. It's good for light armor builds to have their weapon refined +4 at least.
Skills: All basic single target spells for bosses, Dragons Breath - max, Fire Mastery - max, Stone Barrier - max, Black Ice Dragon Strike - might be useful against fire mobs.
Barbarian: Heavy pure tanks only. Classic tank with max hp and max defense. Need at least 10k hp.Skills: Flesh Ream - max, Alacrity of the beast - to cancel bosses AoE, Talk is Cheap, HP and Attack buff - max, Slam - to push mobs into mages AoE, Sunder - max recommended.
Blademaster: Heavy axe/polearm build. Axe BM is required because they have higher DPS and stun skills(which are agro too). Amount of HP is vital. You don't want to die after using mass agro skill, right? Polearm BMs are good at moving mobs inside mage's AoE. Fists/claws BMs are useless in Gods Rebirth. Skills: Heaven's Flame - BMs main skill here so - max, all other Axe AoE skills, Atmos Strike (sword skill) and Meteor Rush (polearm skill) needed to push mobs into AoE - 1 lvl at least, Axe Mastery - max, Golden Bell - max, Will of Bodhisatva would be nice for the last boss. Put sword, polearm, and Axe in skill bar to switch quickly between weapons.
Archer: Light Armor. Pure dex is welcomed but vit/dex hybrid works as well. Equipment should have hp gems and the weapon should be refined. Remember that Archer is the main DD there so you can draw your own conclusions...
Skills: Bow Mastery - max, Sharpened Tooth Arrow for the last boss - the higher the better, Barrage of Arrows - at least level 6, better to make it higher but keep in mind that higher levels will drain more MP, and at level 7+ two MP regen Auras might not be enough.
Squad:
Cleric, BM, Archer, Barb, Veno, Wizard: Classical bonus party. Besides almost perfect balance this squad gets a bonus of 600 beans at the start which allows you to get one Aura. Usually MP regen to save charms but it depends on the squad. This squad has a chance to complete Gods Rebirth at 75+ and at 80+ it shouldn't have any problems. You will get all beans and finish all quests before you kill the Stage 2 boss, thanks to the Veno.
5. Roles
In this chapter we will talk about each squad members role.
Wizard: Main Goal - Keep Dragons Breath. Since Wiz stand at the front line they take a lot of damage (if Barbs/BMs are
inexperienced). At the first boss wizards and some other squad members go to open chests in the first rooms. Sometimes they have to do it at the second boss too. At the second boss wizards can stay with the cleric to tank the boss. In all other cases Wiz is pure DD.
Archer: Main Goal - Barrage of Arrows and Sharp Tooth Arrow on bosses(if needed). At the second boss Archer stays with Cleric to tank and do damage. Same as Wiz - pure DD.
Clerics: Main Goal - Regeneration Aura (blue bubble). BB should be started before mobs reach Holy Eye. Cleric will solo tank first boss, heal and purify DDs at second boss, and purify the tank at other bosses. May cast def/mdef debuffs on bosses.
BM: Use Heaven's Flame, mass stun/agro taking them from DDs and saving their asses (that's why BMs need tons of HP). Squad leader is usually BM. In the bonus squad BM has to be the leader to get the reward. You cannot pass lead at any time, you cannot dc: this will cause the quest to fail. As squad leader BM will set Auras so give all beans to him/her. At the last boss BM does melee damage with Barb. Also if the squad isn't the bonus squad BMs help archer to start AoE.
Barb: Main goal - mass agro and tanking dozens of mobs (pot/apoth required!). Barb tanks some bosses. Goal 2 - Push mobs inside AoE using Slam. Both tasks are very difficult and require constant attention, thus no chances to go AFK.
Veno: A lot of work at the beginning. Usually Veno goes to the far (4th) room to open chests while having the pet kill mobs there, moving backwards toward the front until all mobs and chests are harvested. After that Veno stays with the squad in the battle area casting Parasitic Nova and Befudding Mist(carefull as range is minimal). Veno's do not tank bosses even with Herc becuase it's a very unreliable method. Veno's can use pets to help kill bosses with skills turned off to avoid stealing agro. Veno also uses Amplify Damage and Pdef debuff. At the last boss it is recommended that the Veno only run in/out to cast amplify, aoe is very strong and can easily kill them.
Luna- Admin
- Number of posts : 83
Age : 39
Location : In My Dreams
Reputation : 0
Registration date : 2009-03-04
![]()
![]()
Re: Rebirth Order Gamma Guide
![]() Luna Sun May 17, 2009 10:01 am
Luna Sun May 17, 2009 10:01 am
6. Positioning
You will start next to the NPC that gives the main quest - Messenger:Metal.
The leader should accept the quest. Then the five Aura NPCs will appear.
Another NPC, named Crisium:Jofeng will appear next to these five, this NPC gives the beans to the bonus squad. The big NPC up on the hill - Harpy Wraith is the one you have to protect. Behind the Harpy Wraith there is a portal that leads to the non-battle area of the instance. There are rooms with chests, some mobs, and quest NPCs here. There are also two forges in the non-battle area where you can craft Tomes, buy pots (max lvl 60), and repair equipment. To return to the battle area you talk to one of the pillars beside the respawn point. One pillar takes you out of Gods Rebirth and one takes you to the battle area(attention! you have to choose the proper level range 70-85). Remember town portal and Teleport incensce will take you to the respawn point in the non-battle area. Those who have their graphics set on high will see a pillar of light at the entrance to the valley. Wiz stands right inside the pillar, on top of the god's eye or right next to it. On the rear edge of his AoE stands the cleric, Archer stands behind the cleric, barb, bm and veno wander about freely, making sure to stay inside cleric's BB range. BM and barb make sure mobs rush right into the Wiz/Archer AoE. Barb takes care of those that don't want to go into the AoE by using slam to push them. Wiz, Archer, and BM set God's Eye as target about 80% of the time. Wizard and Archer start their AoE on the Eye.
7. Stages
Now a few words about each stage. The description won't be too detailed because your own experience is the best guide.
After each stage: Kill the little mob who spawns int he back near the harpy, pick up the coins. BM will farm bonus beans chest, BM will also activate/upgrade auras. Everyone gathers by aura NPCs to rebuff before setting up zhen skills at the God's Eye.
Stage 1
Before you start make sure everyone has two sparks and all buffs. Now activate the quest and get your bonus beans. The squad leader will set the first Aura. Usually MP regen is first. Tip: to set an Aura the squad leader talks to the NPC, gets the quest, and then talks to the NPC again. The God's Eye deals 1 damage from time to time which allows you to target it. The first squad member that gets it targeted lets the squad know so that Archer and Wizard can assist target the Eye and start their AoE. Cleric starts the bubble. Barb will keep an eye on the DDs and help them by using AoE stun and agro skills. At this time the Veno will go through the portal to the farthest (4th) room in non-battle area to open chests and kill mobs. BM goes with Veno but stays in the first room, waiting for an NPC to spawn (Reciprocator, appears 5 minutes after "Raise your sword" quest is initiated, spawns same time as bean chests and mobs), then initiate the "run quest" and run along the path, talking to the NPCs along the way. Once you speak with the last one, you must return to the front and speak to reciprocator again to complete quest.
Most people use teleport incenses to get to the front faster and thus get beans faster. After completing the quest and recieving beans, speak to Reciprocator again to activate the quest again. This is done a total of 8 times, until all Happy Valley tickets are consumed. During Stage 1 (including time to kill the boss) Quester should be able to finish five quests (pro's can do six). In that time the Veno should have cleaned the fourth room. As the last monster dies all members except the cleric should run through the portal to open chests in the second room (near the abyss). When the boss - Element Summoner appears on the map you have to watch the time because you only have 15 minutes to kill the bosses in Gods Rebirth. If you go over 15 minutes the mission is failed. The cleric alone tanks the boss. Heal yourself and try to attack. Rare stuns from the boss shouldn't be a problem. Stay at Aura's range to keep your charm from ticking. Common sequence is heal, heal, attack, attack, repeat. The squad has 11-13 minutes to open chests and kill mobs. In that time the cleric should take off about 20-65% of the bosses HP. If the cleric needs help the wiz should return to battle. When the 11-13 minutes are up (boss should be at about 10% hp left) call all squad members (except veno) to the battle zone. Rebuff when the boss is dead . After the bosses death you will see a chest, Bm should farm this chest for the beans, and set auras.
Stage 2
Veno should now be collecting chests in the third room. BM goes to finish the last quests. Only four members stay to kill mobs again. Tactics are the same but mobs are stronger now and magic attacks come more often. From time to time the barb has to move mobs inside the AoE. As the last fire mob dies fall back, the boss is coming. Often this is the last boss for inexperienced squads. Turn on your timers. This time the cleric and archer will stay at the boss. If the archer is 80+ it's enough. If not it's good to have the wizard there but only if cleric has purify at 7+. DDs should keep the boss at max range while the cleric heals and purifies them from max range to avoid AoE damage. This boss has nasty debuffs that increase metal damage. The problem is that these debuffs stack making the damage go insanely high. Common tactics for the cleric here are: purify, iron heart, iron heart, repeat on second DD. Do this for about 10 minutes. When the bosses HP gets down to 5% or so barb and wiz and BM return to battle section to finish boss, set up for next wave, and BM to set more auras.
Stage 3.
By now you should have finished all quests, chests, and mobs (non-battle area). If so you can forget about the portal behind you except for the cases when you have to leave or repair equipment. If you still have something to do in the non-battle area the Veno goes to finish it. Mobs should be easy now considering the BM works with the team now. Easy kills just don't forget to push mobs inside the AoE. Fire wave is quite easy too. Standard tactics for the thrid boss Life Defector. Barb tanks and cleric heals. This boss has some a spell for mass buff removal. Rebuff isn't necessary. Just give the Barb the defense buff. This boss also uses Bramble which means BM shouldn't use Heaven's Flame. Veno shouldn't use pets, only normal attacks, Amplify Damage, and Purge to remove Bramble. When the boss dies open chests and rebuff. Raise Attack Aura's level and if you have enough beans start to raise HP regen Aura. You can leave Defense at level one or raise it to level three there's not a big differance. All squad stays together so you won't need timer untill the last boss.
Stage 4
By now even the slowest squads should have finished all quests, chests, and mobs so the Veno stays with the squad and helps kill mobs, level 7+ Parasitic Nova works good). Mobs aren't too hard just keep in mind that each Stage brings tougher ones. You already have higher level Aura's so - easy. Fourth boss Earthquaker has AoE sleep and defense debuff. Veno can use pets on this boss with a little risk as all squad members could fall asleep. One of the easiest bosses.
Stage 5
Now you have to pay more attention to the battle. Some mobs have Bramble (Cracking Lightning for example) so BM shouldn't use Heaven's Flame and other AoE skills. The fourth wave will bring horsemen. A tricky thing is that it's really hard to get them out of peaceful stance, in which mobs restore their HP. Hard to know if it's a bug or was intended to be that way. Veno with a pet can take care of them until the boss comes. If you're lucky horsemen will agro the cleric or wizard and will stand in AoE until death. Another effective way to agro the horsemen is a normal melee attack, doesn't matter which class but preferably one with higher accuracy, standing in front of the horse but not too close or it will just run away. After someone aggro's a horseman the others use assist target and kill it. It was noted, but not confirmed, that horsemen agroed wizards more often if AoE was set right in the pillar. Maybe it was just coincidence. Starting in this Stage you will see Aqua Wraiths which have the mana drain ability. Archers should pay attention to their MP to avoid the AoE being cancelled. Use MP pots if needed.Fifth boss Aqua Source looks quite peaceful but can sometimes kill DD using it's physical and magical defensive debuffs. It doesn't have any special abilities. Barb tanks while cleric heals and purifies when needed. If you haven't killed all the horsemen yet do it now while killing the boss because they can be trouble during the next Stage. If someone needs repairs go to the forges. After bosses death rebuff. Max Attack Aura, raise HP regen, and raise Defense Aura (at least one level of Defense Aura is required).
Stage 6
Often the last Stage for many squads under 80 and some over 80 if they messed up. There nothing special at the beginning. The mobs are tough but easy to kill. After the second wave you will notice suspicious silence. Attention!!! Two waves of mobs are coming at the same time. As you killed the last mobs of the second wave the cleric and DDs should cancel their AoEs and get ready to use Dew of God Protection to absorb damage. Do not use it until the mobs are very close, just before they could start hitting you, use dew and then set AoE quickly. You may also want to use a Healing Orb, increases HP regen by 100 for 10 minutes. When that's done start the AoEs. BM waits until a large group of mobs gather together and takes agro by using AoE skills. A few seconds later Barb steals mobs by using Roar. Don't forget about Tranquilizing orbs, invulnerable for 8 seconds. Six seconds after Barbs mass agro Veno should cast Parasitic Nova. That gives the squad a few more seconds. Then again the BM uses stun skills. The whole squad spams pots, red and purple, non-stop. To be successfull, coordination of Veno, BM, and Barb actions is required. Voice chat! Not the text kind. Barb and BM should keep an eye on the cleric and DDs HP to see when to start their stun/agro cycle. Often one of the DDs will die here. There's a risk to be ported to Thousand Streams, if any member other than the Veno is ported to Thousand Streams, this is considered a fail, as the squad will not be able to hold out for the rest of the run. If wiz, archer, cleric, bm, or barb are ported out, try to get to and finish the boss for the stage you are currently on, then exit. If you make it past the double wave you're more than half way to victory. If not, don't get upset, keep trying. Don't relax after the double wave. Fire mobs are incoming. They can finish off your squad if not all of the double wave mobs are dead. After all that the boss Flame Strength will look like a joke despite the fact that it comes with three Heaven's Judgments. On this boss the cleric should pay close attention to his/her BB. It might be canceled so reset it ASAP. Wizard and archers keep their AoE going. Barb tanks the boss while Veno Herc tanks and kills the Judgements. If the Veno doesn't have Herc the Barb tanks the Judgements too. It takes 5-10 minutes to kill them. When that's done get the reward and rebuff. Leader should raise HP regen and Defense Aura's to max, and if there's enough left raise defense.
Stage 7
Take your spots ASAP the mobs in the first wave are fast. One of the waves will bring horsemen again. Use the same tactics as the last group. Veno's, at wood wave, try to use your Parasitic Nova on mobs without magic immunity or stun won't work. This boss - Shattered Soul is easy. The cleric can keep the BB up while the Barb tanks. At this time some items usually require repairs so you can go do it one at a time. This boss takes 7-10 minutes to kill. Rebuff and max all Auras.
Stage 8
The last Stage with normal mobs. The first wave are fast mobs again. You will see more Heaven's Judgements and horsemen. This boss - Broken Mind is easy. The barb tanks. This one is killed even faster than the previous one. Rebuff for the final boss.
Stage 9
No mobs. The final boss - Element Lord is the second hardest moment in Gods Rebirth after the double wave. It has a huge amount of HP, short range physical AoE (deadly for robes and in some cases light armor builds). How to kill it? Barb and BM stay at the pillar while all others fall back towards the portal. When the boss comes the Barb takes agro. After a few seconds, to make sure the barb has agro, the BM starts his/her attacks. The most important thing is to keep the boss at the pillar. Auras help a lot, though charms will still tick. A bit later the DDs start their attacks. Archers use Sharpened Tooth Arrow taking off large amounts of HP. After the archer takes position at max range the cleric sets bubble at max range to heal the DDs. Wizard and Veno use their normal long ranged attacks to stay inside the BB AoE. Veno uses Herc on the boss. Auras will heal Herc too. If you have a brave light armor veno (not robe!!) in your squad she can Amplify Damage from time to time. Another important thing is for Barb and BM to use Vacuity Powder in rotation to avoid stuns, because this boss stuns very often. If they don't have powders then they should tell the squad when they're stunned so DDs can stop their attacks as they can easily steal agro and die. If it happens the barb should get the boss and take it back to the pillar ASAP when stun wears off. After stun is off DDs can resume their attacks. Note for DDs: remember that if you die you'll come back without Barbs HP buff so your chances of dieing again grow. Attack carefully so you don't steal agro. Use damage absorbing meds if needed. At 50% HP it will be really had to take agro from the Barb so you can increase your DPS.
Luna- Admin
- Number of posts : 83
Age : 39
Location : In My Dreams
Reputation : 0
Registration date : 2009-03-04
![]()
![]()
Re: Rebirth Order Gamma Guide
![]() Luna Sun May 17, 2009 10:02 am
Luna Sun May 17, 2009 10:02 am
8. Auras
The very first one to set should be Mana. This is set before the first wave in the first stage shows up, immideately after starting the quest, and talking to Jofeng. As soon as you have sent it, run to the blue circle of light to enter the non battle area. Veno and BM are interchangable in this section, meaning either BM or veno can run quests or kill mobs. Generally the Veno will mine chests and kill mobs as pets can kill mobs while Veno mines a chest or picks up dropped beans, which is faster than the BM alone doing it, as he can only do one or the other at any given moment. When the person running the quest passes by the person mining, the miner should drop the beans they have collected, and the runner should pick them up. EVERY TIME THEY PASS. When the boss appears in the first stage it is important for all squad members except the cleric to enter the non battle area and farm beans. It is better to focus mainly on mining chests rather than killing mobs, as the time needed to pick up the dropped beans slows the process greatly, and in early stages time is of the essence. When boss is at about 10% left, everyone returns (except miner, unless it is the BM) and drops beans on floor near aura npcs and BM will pick them up and set more auras. It is important to get all auras to lvl 1. Attack, HP, Defense, then chi. once all of these (including mana) are at lvl 1, you will focus on maxing out Attack and HP auras. Alternating between the two until they are maxed (npc will disappear once they are maxed out). After that you will put all your beans into
Defense. Chi and Mana at level 1 are perfectly fine to complete a full run (9 stages).
Attack aura increases damage done to mobs, as well as the strength of cleric's blue bubble.
HP aura regens a veno's pet's hp as well, however, do not fully rely on this. From personal experience with my own herc, the hp aura does not heal fast/often enough to keep herc alive during mob waves, and likewise when tanking a boss. I'd recommend NOT using any pet during mob waves, and only taking out a herc for bosses.
Luna- Admin
- Number of posts : 83
Age : 39
Location : In My Dreams
Reputation : 0
Registration date : 2009-03-04
![]()
![]()
Re: Rebirth Order Gamma Guide
![]() Luna Sun May 17, 2009 10:04 am
Luna Sun May 17, 2009 10:04 am
Note: This guide was not written nor edited by me. I simply posted it for the benefit of all members. Hopefully it will be helpful for first timers in Rebirth Order and also to experienced players as well. Cheers 
Luna- Admin
- Number of posts : 83
Age : 39
Location : In My Dreams
Reputation : 0
Registration date : 2009-03-04
![]()
![]()
Re: Rebirth Order Gamma Guide
![]() Luna Sun May 17, 2009 11:00 am
Luna Sun May 17, 2009 11:00 am
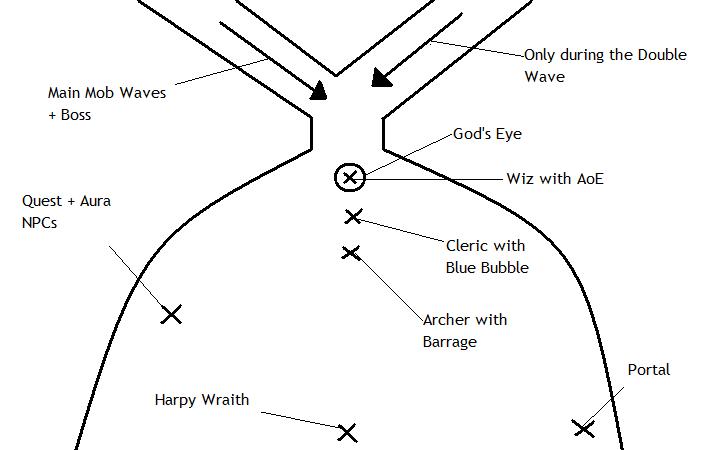
Heres a diagram I made to illustrate the positions of the respective players etc. I know its lousy but i tried >.>
Luna- Admin
- Number of posts : 83
Age : 39
Location : In My Dreams
Reputation : 0
Registration date : 2009-03-04
![]()
![]()
Re: Rebirth Order Gamma Guide
![]() Luna Sun May 17, 2009 11:05 am
Luna Sun May 17, 2009 11:05 am
Lastly a self-check for those who are interested to participate..
1. HP - At least 3.4k HP with a barb buff
2. HP/MP Event Food - Multiflavor Jiaozi, 2500 HP over 10 seconds/ Sesame-flavored Jiaozi, 3000 MP over 10 seconds
3. HP/MP Charms - An absolute MUST
4. Dew of God Protection - An absolute MUST as well, to be used just before the double wave
5. Elixirs/ Hsiaoko Mantou/ Beautiful Chang's Mantou - Recommended to be used during the double wave as pots and Dew sometimes cannot keep up with the damage taken
Luna- Admin
- Number of posts : 83
Age : 39
Location : In My Dreams
Reputation : 0
Registration date : 2009-03-04
![]()
![]()
Re: Rebirth Order Gamma Guide
![]() Luna Sun May 17, 2009 11:06 am
Luna Sun May 17, 2009 11:06 am
Personal experience is still the best for rebirth order, as guides are only able to explain the theorem. So, get a squad together and go for it! ^^
Luna- Admin
- Number of posts : 83
Age : 39
Location : In My Dreams
Reputation : 0
Registration date : 2009-03-04
![]()
![]()
Rebirth
![]() MasonKing Wed May 20, 2009 10:46 am
MasonKing Wed May 20, 2009 10:46 am
OMG....Thanks Luna...WOW! That was a lot of info and Im sure we'll put all of it to good use. Right now tho Im waiting for lvl 80 b4 I even try Rebirth again...I kept getting pwned last time I tried and it wasnt fun lol.
Again, thanks for the info and hard work..

Mason
Again, thanks for the info and hard work..
Mason

MasonKing- Number of posts : 282
Location : Southern California
Reputation : 10
Registration date : 2009-05-12
![]()
![]()
Re: Rebirth Order Gamma Guide
![]() FOUR KING GOOD Thu May 21, 2009 1:56 am
FOUR KING GOOD Thu May 21, 2009 1:56 am
Sounds fun, but very hard. Ty for the guide.

FOUR KING GOOD- Number of posts : 275
Age : 57
Location : Sitting down mostly in the UK
Reputation : 5
Registration date : 2009-03-05
![]()
![]()
Rebirth Order Gamma Add-On (Clerics)
![]() Luna Mon May 25, 2009 4:46 am
Luna Mon May 25, 2009 4:46 am
After some personal experiences in Rebirth Order Gamma runs, I decided to add on a little to the guide with what knowledge I have. Anyway, there are supposedly 2 hard moments in Rebirth: The double wave and the last boss, Element Lord. Even most squads which make it past double wave find it hard to take on Element Lord. The reason is because it has a VERY strong physical AoE which can one-hit arcane armor and light armor builds easily. So basically, the cleric is one of the first classes to be taken out by this AoE. Without the cleric, Element Lord's AoE will hit for full damage as there is no blue bubble (Regeneration Aura) which can be around 3.6k to 5k damage with about 2.1k physical defense. Blue bubble will effectively cut this amount of damage by half, thus making it much easier. But since the cleric is the first to die at this AoE, there is no blue bubble to support the team. How to counter this? This mainly focuses on the cleric doing his/her part to stay alive as there is really nothing the rest of the squad can do for u if u cannot take the AoE. Two things that can be done:
1. Apothecary Pills + Elixirs/Hsiaoko Mantou
2. Plume Shell + Tree of Life + Wind Shield
I'll explain in detail below for no. 1. What do i mean by apothecary pills + Elixirs/Hsiaoko Mantou? If the AoE is able to kill u in one hit, this may not work, but u can use apothecary pills like Dragon Lord's Powder (Halves all damage for the next 8 seconds), damage-absorbing meds like Dew of God Protection (Absorbs at most 3000 damage for the next 30 seconds) etc. If you go for Dragon Lord's Powder, u will also want to bring along elixirs or mantous to instantly restore hp as regular pots work too slowly and u are likely to die before the effect sets in. HOWEVER, as u can only use apothecary pills BEFORE u cast blue bubble, this will only buy u a few seconds at most, which means u will still be vulnerable for the rest of the time u are doing bubble. U will still need pots/elixirs in case bubble does not regenerate enough hp in time. If u have around 3.8k to 4k hp, u should be fine with this method.
Second, u can use skills like Plume Shell, Tree of Life and Wind Shield (Both genie skills) to keep u alive. This requires some skill and timing to carry out perfectly, and even doing this perfectly does not mean u will not need pots/elixirs. U'll also want to juggle the skills effectively to avoid leaving an opening for the AoE to kill u. The stats for the genie skills Tree of Life and Wind Shield are listed below:
Tree of Life LVL 10 - Increases maximum HP by 60% for 5 seconds and restores full hp once every 3 seconds for a max of 6 seconds. Every 40 points of Dexterity increases the max hp duration by 1 second. 130 Energy, 200 Stamina, 60 second cooldown
Wind Shield LVL 10 - Decreases damage taken by 30%, increases attack speed and Dexterity (player) by 10% for 8 seconds. Every 50 points of Dexterity increases the duration by 1 second. 80 Energy, Stamina 210, 30 second cooldown
However, even with all these strong skills it is still possible to die by the AoE. The main purpose of using these skills is to buy enough time for bubble to set in, thereby reducing the damage by half, which is, in most cases, more than enough to save ur life. U will definitely need a barb HP buff, so try not to die because the barb cannot buff u again if u die. Its also good to get a pure Dex genie as these are the ones which will give u the longest buff times. Genies only need around 130-140 Energy, and 130 is enough for an average genie. Also, the Vit genie, Discipline, is a good genie choice for buff/offense genies. How so? I'm sure that u have noticed that every genie comes with a particular attribute at 15 points. This attribute cant be reset below 15 points, and thus it means that it is impossible to get a pure Dex genie if u get a Strength genie AKA Infliction. What exactly can be considered pure? For a pure Dex buff genie (I'll use Discipline) the stats are would be: 3 Strength, ##Dex (Where # is the maximum number of stat points u can put in up to this point), 5 Magic and 30 Vit. Why did I take a Vit genie? Like i explained, a particular genie has a particular attribute that cant be reset below its base number (15), and if u want a pure Dex genie, u dont want to add any extra points into Vit if u can. Since the 15 points given at start is free, it will not take off too much from ur Dex points. Doing this with a Dex genie also works, its up to you.
Luna- Admin
- Number of posts : 83
Age : 39
Location : In My Dreams
Reputation : 0
Registration date : 2009-03-04
![]()
![]()
![]()
Page 1 of 1
Permissions in this forum:
You cannot reply to topics in this forum|
|
|